

Where Do Swivl Videos Upload To?
This browser is no longer supported.
Upgrade to Microsoft Edge to take reward of the latest features, security updates, and technical support.
Notation
The following information is about Microsoft Stream (Classic) which will eventually be retired and replaced by Stream (on SharePoint). To beginning using the newer video solution today, merely upload your videos to SharePoint, Teams, Yammer, or OneDrive. Videos stored in Microsoft 365 the fashion you'd store whatsoever other file is the basis for Microsoft Stream (on SharePoint). Learn more...
Upload a video
Uploading videos with Microsoft Stream (Classic) is easy and anyone can do it.
First uploading videos
Click the Upload icon ![]() at the top of any page or just elevate and drop new videos to i of your groups or channels. You can upload multiple videos at the same time and even browse Microsoft Stream (Classic) while your videos are uploading in the background.
at the top of any page or just elevate and drop new videos to i of your groups or channels. You can upload multiple videos at the same time and even browse Microsoft Stream (Classic) while your videos are uploading in the background.
There are several options for uploading videos. Depending on where you lot start your uploads from, different default permissions will be gear up on the videos, but you tin always change them afterwards.
See this article for in-depth information on video permissions.
Upload from any folio
To upload from any folio:
-
In the Microsoft Stream (Classic) portal, select Create > Upload a video or the upload icon from the top navigation bar
-
Drag and drop or select files from your computer or device.

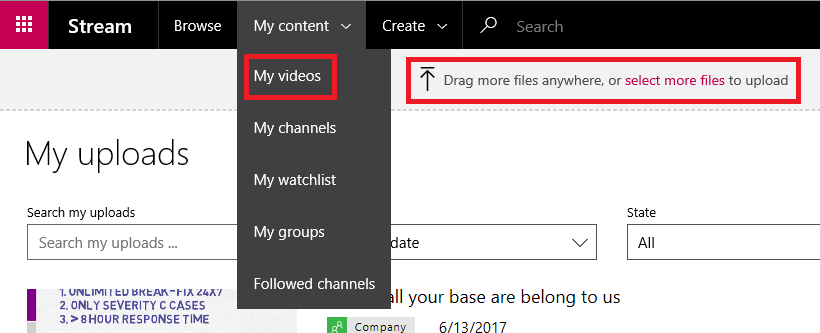
To upload from Videos page:
-
In the Microsoft Stream (Classic) portal, select My content > Videos from the top navigation bar
-
Elevate and drib or select files from your estimator or device
Upload direct to a group or channel
To upload to a group:
-
In the Microsoft Stream (Classic) website, navigate to a group that you can contribute to
-
Select the Upload video button on the grouping's navigation bar or elevate and drop videos when on the group's Highlights or Videos tab

To upload to a aqueduct:
-
In the Microsoft Stream (Classic) website, navigate to a channel that yous can contribute to
-
Click Select more files or elevate and driblet videos directly to the channel page

While your video is uploading and processing, you can fill up out metadata for the video to make it easier to find.
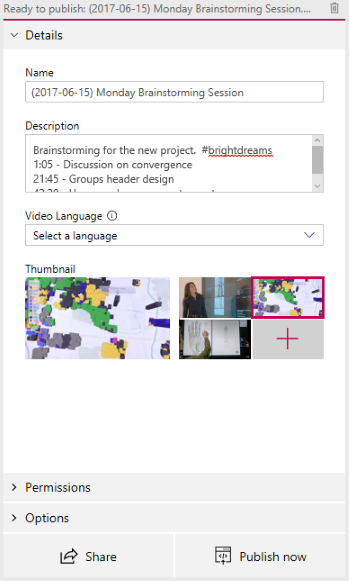
Details
Title & Clarification
Fill up out the title and clarification for your video to give your viewers context for the video. In the description field, you can add together the post-obit to make your video more interactive:
-
Time codes (H:MM:SS) - You tin build an interactive table of contents for the video by typing in the time codes of interesting points in the video. Viewers volition be able to click on these time codes to spring to that point of the video.
-
#Hashtags - Add #hashtags to your video clarification as a lightweight community way to group like videos together. Viewers will exist able to click on the #hashtags and run into other videos with the same tag.
-
Links - Paste in a web address in the description and viewers volition be able to click the link to open your address in a new folio when viewing the video.
Annotation
The title is express to 100 characters. The description is limited to 4,000 characters.
Video language
Select the language spoken in the video. This will enable a closed caption file for supported languages to be automatically generated. In addition, people with the right license will be able to discover your video based on the text in this transcript.
For more information see:
- Auto-generated captions
- Deep search on what'due south said in the video
Thumbnails
Automatic thumbnails are generated for the video later on it's uploaded. When the frames from the video are generated, choose ane to represent your video or upload your ain custom image.
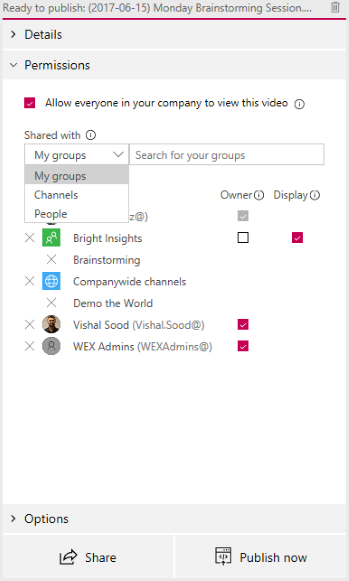
Permissions
In the permissions department, yous tin control who can see your video, who can own and edit it, and which groups and channels it's displayed in.
See this article for more than in-depth information on video permissions.
Allow everyone in your company to view this video
When checked anybody in your organization can see the video and is able to add it to their groups and channels. This, in outcome, makes your video available for viewing companywide. To be able to add a video to a companywide aqueduct, this cheque box must be checked.
When non checked, your video will only be viewable past those people and groups you've made viewers.
Shared with
Apply the Shared with driblet down to narrow your search scope and choice who yous want to share your video with.
-
Groups - search scope to add your video to a group that you can contribute to.
-
Channels - search scope to add together your video to a channel directly, including companywide channels.
-
People - search scope to grant permission to individual people, AD Security Groups, and/or Microsoft 365 Groups that y'all don't have contribute rights to.
Whatsoever person or grouping added volition automatically be granted view permission to your video. If you desire any of these Viewers to also be able to update your video, check the box adjacent to their entry in the Owner column to upgrade their permission.
The Display check box shows up for groups where you are a contributor. This controls if the video shows up in the grouping's pages in Stream. If information technology'due south not checked it means that the group has access if you send them a link or they plant the video in search, just it won't show upward on their group's pages directly.
For more information nigh permissions, run into Video permissions.
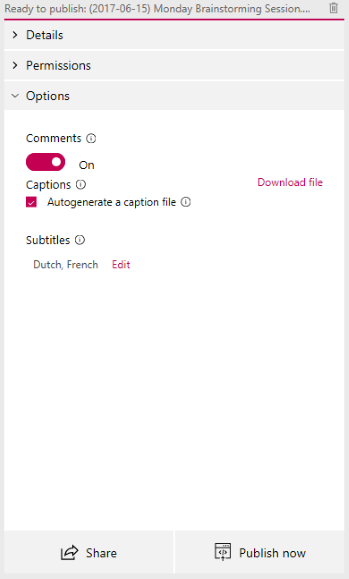
Options
In the Options department, yous can control various settings for the video.
Comments
If you don't desire users to be able to add comments directly on the video player page, set Comments to Off.
Captions
Closed captions are a text version, in the original linguistic communication, of what's spoken in the video. When a video has a caption set, viewers can click the CC button on the player while watching a video to show the captions nether the video.
If you lot've selected a supported Video language in the Details pane for the video, then the Autogenerate a explanation file bank check box will exist checked. This means a caption file volition be automatically generated. In add-on, people with the correct license will be able to discover your video based on the text in this transcript or your own uploaded airtight caption file.
If y'all deselect the box, Autogenerate a explanation file, so you tin can upload your own closed caption file in the WebVTT format.
For more information about captions, see:
- Autogenerated captions
- Deep search on what's said in the video
- Subtitles and captions
Subtitles
Subtitles are a text version, translated into different languages, of what'southward spoken in the video. When a video has one or more subtitles set, viewers can enable the the subtitles on the actor while watching the video.
To upload one subtitle file per linguistic communication:
- Click Upload a subtitle file
- Select the language the subtitle file is for
- Click Select file or drag and drop your subtitle file in the WebVTT format
- Select OK
For more information, see the subtitle and captions article
Publish and playback
In one case your video has been uploaded, and yous are done setting upwards your video, you can press the Publish at present push button at the bottom of the upload bill of fare. This volition make the video available to those yous've shared information technology with equally presently every bit information technology's done processing. Press the championship of the video on the top of the upload carte du jour to run across the playback page for the video.

To modify annihilation near the video subsequently yous've published information technology, become to My content > Videos > More carte ![]() > Edit.
> Edit.
Processing time is based on the length and resolution of your video. Yous won't be able to play the video until it's done processing. Encounter upload processing details for more than information.
Select the Share icon ![]() on the bottom of the upload card to copy a link to the video, share on Yammer, or get the embed code for the video. For more information, run across Sharing a video.
on the bottom of the upload card to copy a link to the video, share on Yammer, or get the embed code for the video. For more information, run across Sharing a video.

Supported upload formats
See supported file formats for more information on what kinds of videos can be uploaded.
Quotas and limitations
See upload quotas and limitations for more data on video, user, and company limits.
Troubleshooting
For common upload errors, see Understanding upload errors.
See also
Get started
Upload processing details
Video permissions
Subtitle and captions
Upload Microsoft Teams meeting recording
Source: https://docs.microsoft.com/en-us/stream/portal-upload-video
Posted by: hessandfular.blogspot.com
0 Response to "Where Do Swivl Videos Upload To?"
Post a Comment